Extended options for configuring Bot
Manual constants configuration
Reading this means that you're ready for a bit of manual labour. If for some reason you've missed the automatic server setup section, you can read about it in the bot contributing guide.
To configure the bot manually, you will only need to set inside the .env.server file the values for the channels, roles, categories, etc.
that are used by the component you are developing.
For example, if we're testing a feature that only needs the announcements channel:
constants.py
class EnvConfig:
    # Defines from where & how Pydantic will be looking for env variables
    ...

class _Channels(EnvConfig):

    EnvConfig.Config.env_prefix = "channels_"

    announcements = 1079790565794779156
    changelog = 1077877318564991006

# Instantiate the class & load the configuration
Channels = _Channels()
.env.server file:
# .env.server

channels_announcements=1077875228002234398
When you launch your bot, pydantic will load up the server constants from the .env.server file if they exist.
Each constants class will define its own prefix, which will make pydantic look for variables that will look like {{env_prefix}}{{attribute_name}} in the environment files
In our example, this will imply that pydantic will look for both channels_announcements and channels_changelog in the .env.server file.
As you can see here, only channels_announcements has been defined in the .env.server file since it's the only one needed, which will tell pydantic
to use the value 1077875228002234398 for the announcements attribute instead of the default 1079790565794779156, and use the default value for the changelog attribute
>>> Channels.announcements
1077875228002234398
>>> Channels.changelong
1077877318564991006
See here for help with obtaining Discord IDs.
If you wish to set all values in your env.server for your testing server, you need to set all the ones prefixed with:
guild_categories_channels_roles_webhooks_emojis_
Working with the help forum
Note: This is only required when you're not configuring the bot automatically
If you will be working on a feature that includes the Python help forum, you will need to use Forum Channels.
Forum channels cannot be included in a template, which is why this needs to be done by hand for the time being.
To activate forum channels, your Discord server needs to have the community feature. If that's not the case already, here are the steps required to do it:
- Go to server settings
- Scroll down to the
COMMUNITYsection and click onEnable Community - Click on
Get Startedand fill out the necessary info
Once the previous steps are done, all that is left is to:
- Create a new channel
- Choose the
Forumtype - Copy its ID
- Add the following line to the
.env.serverfile:channels_python_help={newly_created_forum_channel_id}
We understand this is tedious which is why we heavily recommend using the automatic configuration setup
Reloading parts of the bot
If you make changes to an extension, you might not need to restart the entire bot for the changes to take effect. The command !ext reload <extension_name> re-imports the files associated with the extension.
Invoke !ext list for a full list of the available extensions. In this bot in particular, cogs are defined inside extensions.
Note that if you changed code that is not associated with a particular extension, such as utilities, converters, and constants, you will need to restart the bot.
Adding new statistics
Details on how to add new statistics can be found on the statistic infrastructure page. We are always open to more statistics so add as many as you can!
With the Bot Running Locally
The advantage of this method is that you can run the bot's code in your preferred editor, with debugger and all, while keeping all the setup of the bot's various dependencies inside Docker.
- Append the following line to your
.envfile:API_KEYS_SITE_API=badbot13m0n8f570f942013fc818f234916ca531. - In your
.env.serverfile, seturls_site_api="http://localhost:8000/api". If you wish to keep usinghttp://web:8000/api, then COMPOSE_PROJECT_NAME has to be set. - To work with snekbox, set
urls_snekbox_eval_api="http://localhost:8060/eval".
You will need to start the services separately, but if you got the previous section with Docker working, that's pretty simple:
docker compose up webto start the site container. This is required.docker compose up snekboxto start the snekbox container. You only need this if you're planning on working on the snekbox cog.docker compose up redisto start the Redis container. You only need this if you're not using fakeredis. For more info refer to Working with Redis.
You can start several services together: docker compose up web snekbox redis.
Setting Up a Development Environment
With at least the site running in Docker already (see the previous section on how to start services separately), you can now start the bot locally through the command line, or through your preferred IDE.
- Through the command line, inside the bot directory, with either
uv run task start, or directlypython -m bot. - If using PyCharm, enter
Edit Configurationsand set everything according to this image: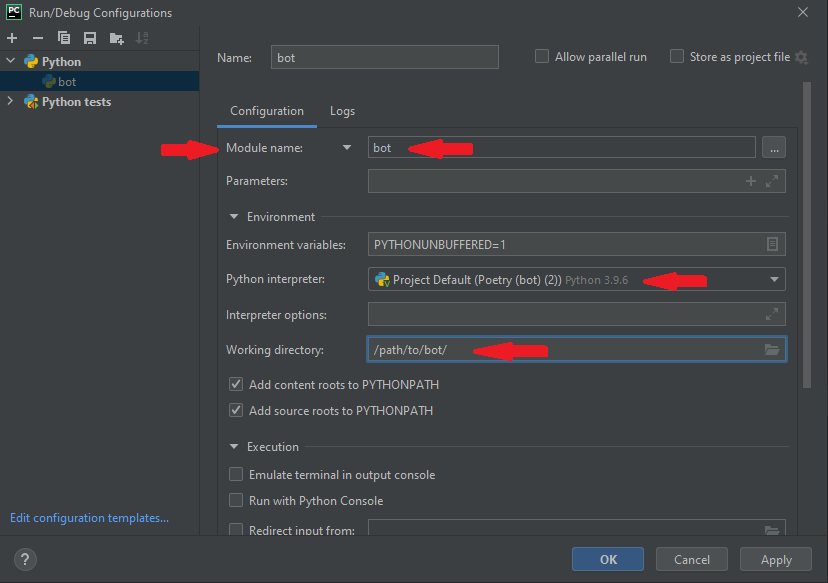
- If using Visual Studio Code, set the interpreter to the uv environment you created. In
launch.jsoncreate a new Python configuration, and set the name of the program to be run tobot. VSC will correctly run it as a module.
With More Things Running Locally
You can run additional services on the host, but this guide won't go over how to install and start them in this way. If possible, prefer to start the services through Docker to replicate the production environment as much as possible.
The site, however, is a mandatory service for the bot.
Refer to the previous section and the site contributing guide to learn how to start it on the host, in which case you will need to change urls.site in .env.server to wherever the site is being hosted.
Starting Redis Using Other Methods
You can run your own instance of Redis, but in that case you will need to correctly set redis_host and redis_port in your .env.server file and the REDIS_PASSWORD in the .env file.
Note: The previously mentioned variables SHOULD NOT be overriden or changed in constants.py
Working with Metricity
Metricity is our home-grown bot for collecting metrics on activity within the server, such as what users are present, and IDs of the messages they've sent. Certain features in the Python bot rely on querying the Metricity database for information such as the number of messages a user has sent, most notably the voice verification system.
If you wish to work on a feature that relies on Metricity, for your convenience we've made the process of using it relatively painless with Docker: Enter the .env file you've written for the Python bot, and append the line USE_METRICITY=true.
Note that if you don't need Metricity, there's no reason to have it enabled as it is just unnecessary overhead.
To make the Metricity bot work with your test server, you will need to override its configurations similarly to the Python bot.
You can see the various configurations in the Metricity repo, but the bare minimum is the guild ID setting.
In your local version of the Python bot repo, create a file called metricity-config.toml and insert the following lines:
[bot]
guild_id = replace_with_your_guild_id
To properly replicate production behavior, set the staff_role_id, staff_categories, and ignore_categories fields as well.
Now, docker compose up will also start Metricity.
If you want to run the bot locally, you can run docker compose up metricity instead.
Working with bot moderation logs
To be able to view moderation-related logs published by the bot to site, you will need to set urls_site_logs_view=http://localhost:8000/staff/bot/logs in your .env.server.
This will work in both Docker and locally.